
Table of Contents
- Understanding the Legal Framework and Why 60 Days Matter
- Step‑by‑Step Process to Initiate a Dispute
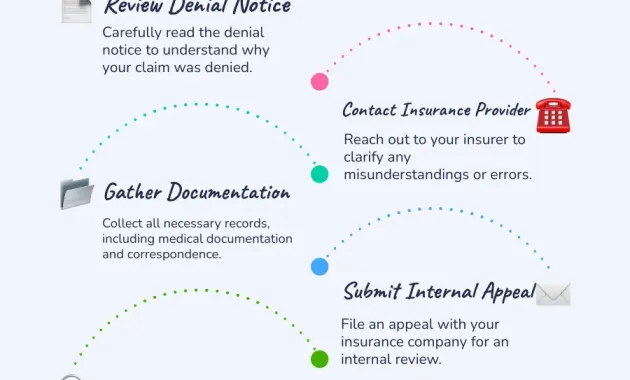
- 1. Review Your Statement Carefully
- 2. Gather Supporting Documentation
- 3. Contact the Merchant First (When Possible)
- 4. Submit a Written Dispute to Your Issuer
- 5. Keep a Record of All Communications
- What Happens After You File the Dispute?
- Possible Outcomes
- Tips to Strengthen Your Dispute
- Document Everything Promptly
- Use the Issuer’s Online Dispute Tool
- Know Your Card’s Specific Policies
- Understand the Role of the Purchase APR
- Stay Calm and Professional
- When the Dispute Is Denied – Next Steps
- Preventing Future Disputes
- Real‑World Example: A Journey from Discovery to Resolution
- Key Dates to Remember
Disputing a credit card transaction within 60 days can feel like navigating a maze, especially when you’re unsure of the exact steps and deadlines. This article walks you through the process as if you were following a well‑marked trail, from spotting the problem on your statement to seeing the final resolution on your account. By the end, you will know exactly what to do, what documents to gather, and how long each stage typically takes.
The 60‑day window is not arbitrary; it is built into the Fair Credit Billing Act (FCBA) to give consumers a reasonable period to identify errors, unauthorized charges, or goods that were never delivered. Missing this deadline can make it much harder to recover the funds, so acting quickly is essential. Below we outline the entire journey, using clear language and real‑world examples that illustrate each milestone.
Understanding the Legal Framework and Why 60 Days Matter

The FCBA sets the baseline for credit‑card dispute rights in the United States. Under the Act, you have the right to challenge a billing error or fraudulent charge, and the issuer must investigate within two billing cycles—usually no more than 30 days—from the day they receive your written notice. The 60‑day rule means you must submit that notice within 60 days of the statement that shows the disputed amount. If you act after the deadline, the issuer can deny the dispute and you may have to resort to other legal avenues.
For many cardholders, the 60‑day period aligns with the rhythm of monthly statements. When a charge looks suspicious, you typically notice it within the first few weeks after the statement closes. Acting promptly gives the issuer enough time to investigate while you still have supporting evidence, such as receipts, emails, or screenshots of a merchant’s website.
Step‑by‑Step Process to Initiate a Dispute
1. Review Your Statement Carefully
- Locate the exact transaction amount, date, and merchant name.
- Check for any duplicate charges or variations in the description that might indicate a processing error.
- Mark the transaction and note why you believe it is incorrect (e.g., unauthorized, undelivered goods, or billing mistake).
2. Gather Supporting Documentation
- Receipts, order confirmations, or shipping tracking numbers.
- Correspondence with the merchant, such as emails or chat logs.
- Proof that you attempted to resolve the issue directly with the merchant, if applicable.
3. Contact the Merchant First (When Possible)
Many issuers require you to give the merchant a chance to correct the problem before they will open an investigation. A quick phone call or email can sometimes resolve the issue without formal dispute paperwork. Document the date, time, and outcome of this interaction for later reference.
4. Submit a Written Dispute to Your Issuer
The dispute must be in writing and include:
- Your name, account number, and contact information.
- The date of the statement containing the disputed charge.
- A clear description of the problem and why you are disputing it.
- Copies (not originals) of any supporting documents.
Most banks provide an online portal where you can upload files and submit the dispute. If you prefer, you can mail a letter to the address printed on your statement. Using the portal often speeds up the process, as it creates an electronic trail that the issuer can track.
5. Keep a Record of All Communications
Save confirmation numbers, email receipts, and any reference IDs the issuer gives you. This record will be valuable if you need to follow up or if the dispute escalates to a higher authority.
What Happens After You File the Dispute?

Once the issuer receives your written notice, the FCBA requires them to acknowledge receipt within 30 days. They then have up to two billing cycles—generally no more than 30 days—to complete their investigation. During this period, the disputed amount is typically removed from your balance, and you won’t accrue interest on it.
If the issuer finds that the charge was indeed erroneous, they must correct the error, refund any interest or fees that resulted, and send you a written explanation of the outcome. If they determine the charge is valid, they will inform you of their findings and provide a copy of the merchant’s evidence.
Possible Outcomes
- Full Refund: The issuer reverses the charge and any related interest.
- Partial Refund: Some portion of the charge is returned, often when only part of a service was delivered.
- Denial of Dispute: The issuer concludes the charge is legitimate. You may still have options, such as filing a complaint with the Consumer Financial Protection Bureau (CFPB) or pursuing a chargeback through the card network.
Tips to Strengthen Your Dispute

Document Everything Promptly
Time stamps matter. Capture screenshots of the disputed transaction on your online statement, and note the exact moment you discovered the issue. This creates a timeline that shows you acted within the 60‑day window.
Use the Issuer’s Online Dispute Tool
Most banks have a dedicated online portal for first‑time login and account setup that includes a dispute submission feature. The tool automatically formats your request, attaches relevant fields, and tracks the case status, reducing the chance of missing required information.
Know Your Card’s Specific Policies
While the FCBA sets the baseline, many premium cards offer extended dispute windows, zero‑interest periods during investigations, or dedicated fraud teams. For example, the Visa Signature vs. Infinite tiers provide additional consumer protections that can be leveraged during a dispute.
Understand the Role of the Purchase APR
If the disputed charge is linked to a high purchase annual percentage rate (APR), it can affect the interest that accrues while the investigation is pending. Reviewing the definition of purchase APR helps you anticipate any potential cost impact if the dispute is denied.
Stay Calm and Professional
Emotionally charged language can slow down the process. Stick to facts, present clear evidence, and follow the issuer’s instructions. A professional tone encourages faster resolution and minimizes the chance of miscommunication.
When the Dispute Is Denied – Next Steps
If your issuer denies the dispute, you still have avenues to pursue:
- File a Complaint with the CFPB: The Consumer Financial Protection Bureau tracks complaints against financial institutions and can intervene on your behalf.
- Request a Chargeback Through the Card Network: Visa, Mastercard, and other networks have their own dispute processes that operate independently of the issuer.
- Consider Small Claims Court: For larger sums, filing a claim in small claims court may be a viable option, especially if you have strong documentation.
Before taking legal action, review your cardholder agreement to understand any arbitration clauses or required steps. Some agreements mandate that you attempt mediation before proceeding to court.
Preventing Future Disputes
While the dispute process is an essential safety net, preventing errors in the first place saves time and stress. Here are practical habits to adopt:
- Set up transaction alerts via SMS or email so you are notified of every purchase instantly.
- Regularly review your statements, ideally weekly, rather than waiting for the monthly cycle.
- Maintain a secure online shopping environment: use strong passwords, enable two‑factor authentication, and shop only on reputable sites.
- Know your card’s specific features, such as whether it offers zero‑liability protection for unauthorized purchases.
Real‑World Example: A Journey from Discovery to Resolution

Emily, a frequent traveler, noticed a $250 charge from “Hotel XYZ” on her March 5 statement. She had never stayed at that property. Within ten days, she logged into her card’s online portal, flagged the transaction, and contacted the hotel’s customer service. The hotel claimed they had a reservation, but Emily had no confirmation email. She saved the email thread, her credit‑card statement screenshot, and the hotel’s response.
Emily then submitted a written dispute through the portal, attaching the screenshots and a brief statement that the charge was unauthorized. The issuer acknowledged receipt on March 20 and removed the $250 from her balance while investigating. By April 2, the investigation concluded: the hotel had mistakenly billed the wrong account. The issuer credited the full amount, along with $15 in interest that had accrued before the dispute was opened.
Emily’s experience highlights how acting quickly, documenting every interaction, and using the issuer’s online tools can lead to a swift, favorable outcome.
Key Dates to Remember
- Day 0: Transaction appears on statement.
- Day 1‑30: Review statement, gather evidence, and contact merchant.
- Day 31‑60: Submit written dispute with supporting documents.
- Day 61‑90: Issuer acknowledges receipt (within 30 days) and completes investigation (within two billing cycles).
- Day 91+: Receive resolution; if denied, consider next‑level actions.
Marking these milestones on a calendar or setting reminders can ensure you never miss a deadline.
In summary, disputing a credit‑card transaction within 60 days follows a clear, legally defined path. By reviewing statements promptly, documenting every step, using the issuer’s online dispute tools, and understanding the timelines, you protect your finances and maintain a healthy credit profile. Should a dispute be denied, the process does not end; you have additional channels to explore, from regulatory complaints to chargebacks. The most effective strategy, however, remains prevention—staying vigilant, using alerts, and knowing the specific protections your card offers.